Process Sewing of Garment
Sewing: Part of the production after cutting process of
manufacturing the garment by combining several panels into a clothing product,
Shirts, skirts, dresses, pants, vest, skirt, jacket or other garment products
that fit Detail specification that has been set with the buyer. Sewing is a
process of the entire garment production process and consists of several
operations Require many employees.
- The process flow in sewing is outlined in the following:
- Sewing works with Planning provides Detail Order (DO) including Comment from the buyer.
- Planning provides material requisition (MR) that contains material that is Needed.
- Planning gives all information from the buyer to the sewing part in the form Comment or additional information about the sample. And samples that have been Approved by the buyer to be a reference for sewing.
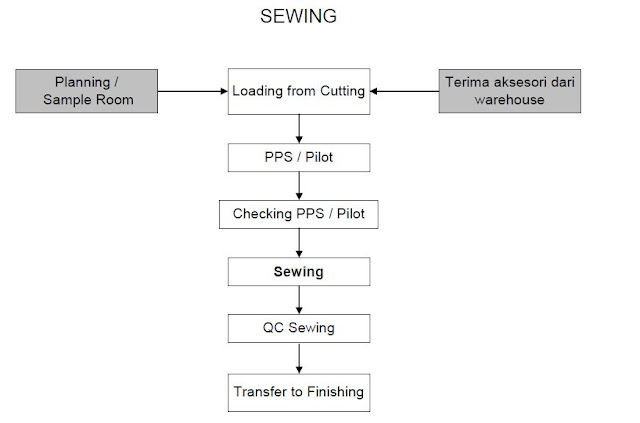
- Panel that has been cut and in give fusing in transfer to sewing section and Done per style or per lot to avoid mixing the panel one type of with other types.
- PPS or pilot is an example of garment made by line pilot or supervisor Based on the buyer's approved sample. The purpose of PPS is to find difficulties while sewing, determining time study, Determining the work study, accuracy of size specifications, and as instructions To make a pre lay out machine.
- RPM/Pilot is done by Head Sewing Department, sample Room and QC buyer. Each of these parties provides information process, determining critical processes and providing solutions or work methods The level of difficulty of the product to be made.
Industrial Engineering Department will be involved in the
process by Give an overview of the results of time study and method study and layout
the machine. After all the processes are passed, the sewing manager will The
mass production process immediately began.
What makes special sewing clothing is a small and unique
detail. From stitched buttonholes is perfect to apply topstitch like an expert.
In this article, you'll find some great ideas for making the most of your
outfit – sewing.
A. Use Sewing Machine for Stitch the Buttonholes precisely.
Measure your buttons. Add 1/4 "and set the arrows on
the Buttonhole legs with a slide for the long one. Before placing the spindle,
placing the spindle yarn through a small hole in the finger of the bobbin
casing. Then load it up on the machine as usual. This will tighten the tension
of the bobbin yarn and give the yarn over a more rounded appearance on the
right side of the fabric.
Thread the top of the machine and attach the Buttonhole
legs. It is a good idea to test the size of the studs before stitching your
garment. So, grab a piece of cloth and position it under the Presser feet with
the top of the buttonholes positioned beneath the needle.
Set your machine to stitch the studs. Stop the stitches and
press the reverse button once to let the machine know you have reached the
desired length. When the studs are done, the needle rises and the center itself
is above the buttonhole tip.
Thoroughly cut the buttonholes and test your buttons. If it
fits well, then you are ready to start stitching the rest of the buttonholes on
your garment.
B. Insert Open zipper easily
Before attaching an open zipper, we will sew the stay into
the zipper opening. Cut the live using a strong woven cloth that is 3 1/4 "(8 cm) wide and 2 1/2 " (6 cm) longer
than the zipper opening.
Using a pen or pencil, mark unzipped on the garment and
stay the same with half the width zipper ribbon plus 5/8 "(1.5 cm), which account for stitching
allowance above. If your seam ration is different (i.e., 1/4 "or 1/2 "), mark it accordingly.
Match the rectangular sign on the clothes and stay and the
baste machine together.
Cut the center to about 1/2
"Above the end, then cut diagonally into the corners. Be careful
not to cut through stitches!
Turn stay inside and press, making sure that the rolls stay
into just a little bit.
The bottom zipper center opens with the bottom of the
zipper stop flush against the bottom end of the opening. Slip Stitch in place.
Lift the bottom of the garment to expose the tip of the
zipper ribbon and the cloth triangle underneath.
After, fold back one side of the garment and start from
underneath, sewing the garment to the zipper ribbon along the Olesi line.
Repeat on the other side. To finish, remove the grease and lightly press on the
right side.
C. Top Stitch like a professional
There are some tips that can up your jewelry game. With
proper planning and some clever, professional secrets, anyone can have a pretty
topstitch every time. Follow these tips to set up your topstitch.
- Plan, before you sew,
- Know your thread selection,
- Choose the right Stitch,
- Choose a sharper needle,
- Always use the guidelines,
- Glue cloth is your best friend.
- Beautiful stitches to hold it all together
- Making beautiful stitches can be a challenge if your sewing machine is not set up properly. Follow these simple steps to set it up.
Flow Chart sewing:
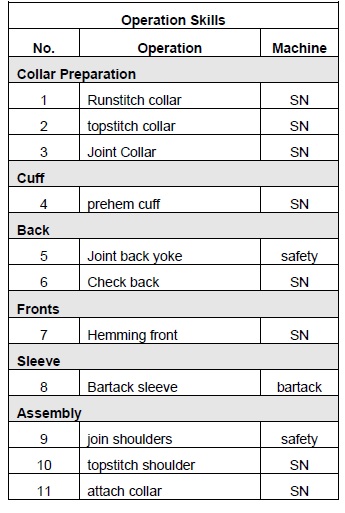
Operator Ability Mapping such as in the table below the
operation of the sewing
Operation Skill Assessment:
You May Also Like:
- How to use Acceptable Quality Level (AQL)
- Container Loading Check
- Carton Drop Test Check
- Electronics Inspection
- During Furniture Inspection
- During Hard-Lines Inspection
- Preshipment Inspection Furniture
- Furniture and Rattan Inspection
- How to Step use Moisture Content (MC)
- How to check Moisture Content (MC) wood
- Pre-Shipment Inspection Hardlines and Softlines


Belum ada Komentar untuk "Process Sewing of Garment"
Posting Komentar